Vue 源码解读之一首次渲染

打包构建

观察项目的 package.json 文件中的 scripts 字段,我们以 npm run dev 为例,当运行该命令时,会执行 scripts/config.js 脚本。
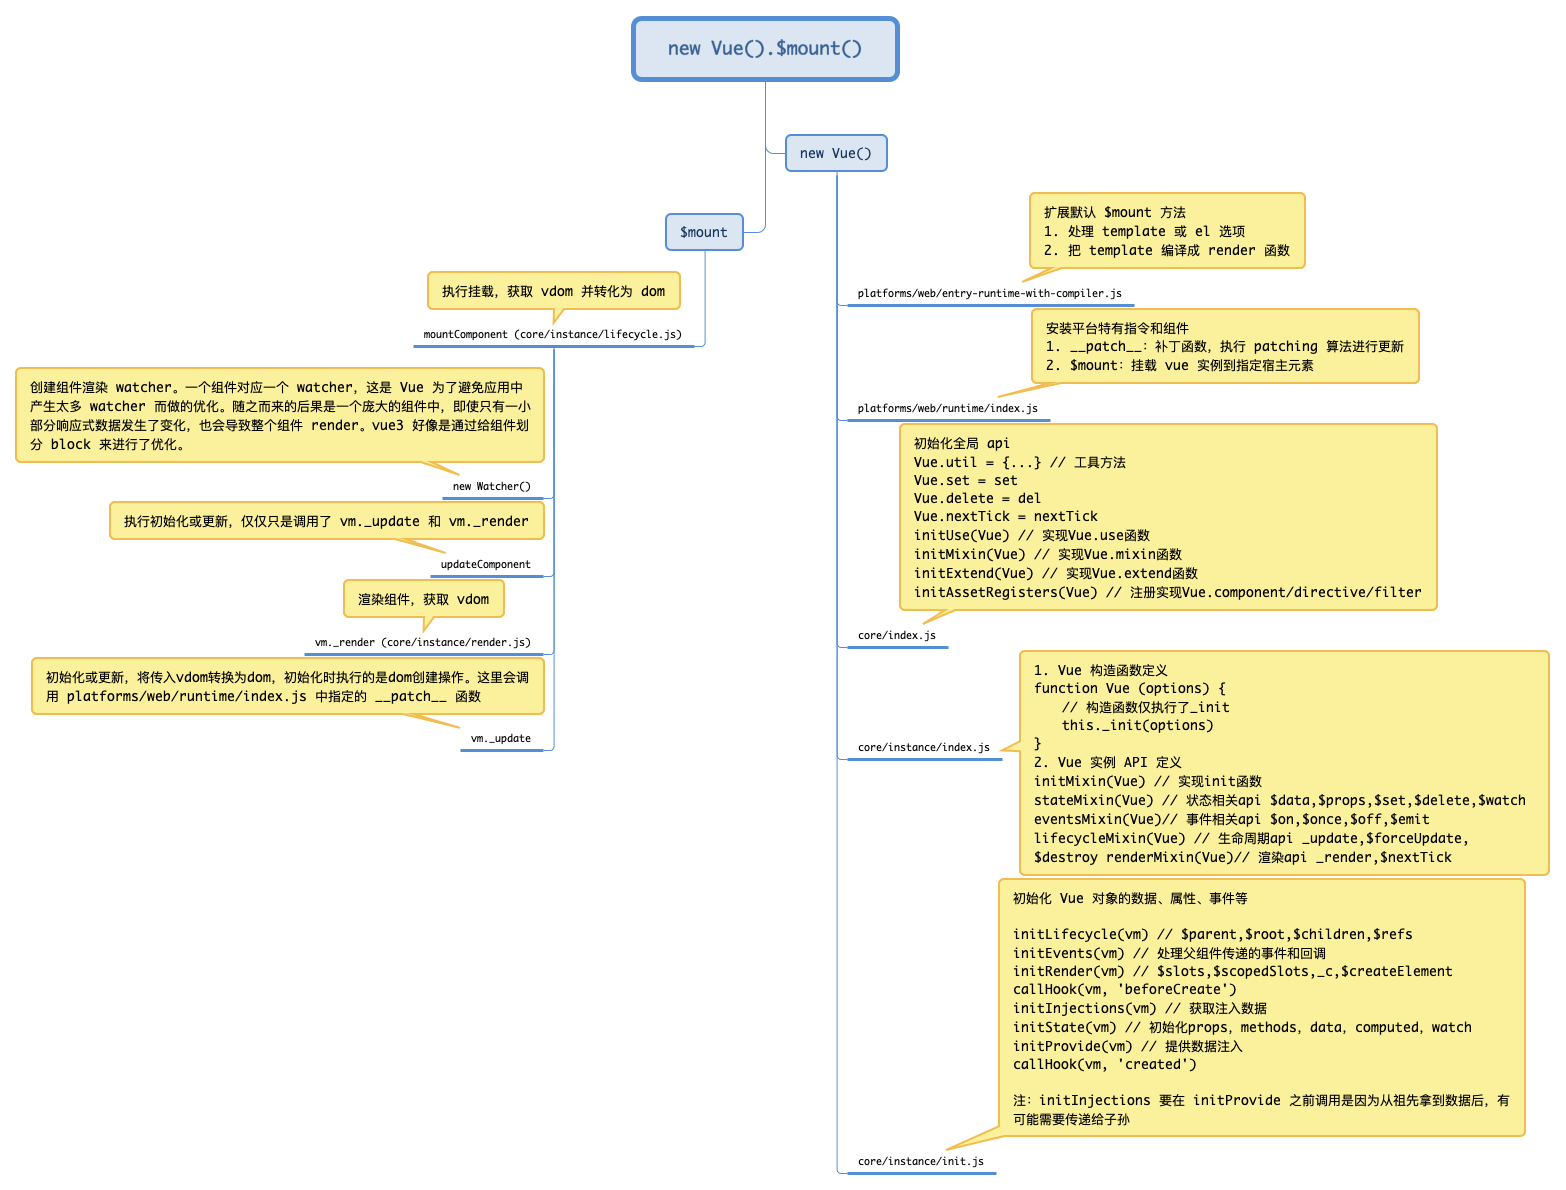
该脚本中定义了很多种构建目标,比如我们要分析的 web-full-dev,它的构建产物包括了运行时和编译器。注意到 entry 这个字段 web/entry-runtime-with-compiler.js,它表示的是构建的入口文件,我们来看看该文件主要做了什么。

该文件中最重要的工作之一是重写了 $mount 方法:

1
2
3
4
5
const mount = Vue.prototype.$mount
Vue.prototype.$mount = function (
el?: string | Element,
hydrating?: boolean
): Component {}

而该函数中则主要是为了将 Vue 实例中的 template 转换成 render 函数:

1
2
3
4
5
6
7
8
9
10
11
12
const {render, staticRenderFns} = compileToFunctions(
template,
{
outputSourceRange: process.env.NODE_ENV !== 'production',
shouldDecodeNewlines,
shouldDecodeNewlinesForHref,
delimiters: options.delimiters,
comments: options.comments,
},
this
)
options.render = render

该文件头部还引入了 ./runtime/index,我们顺藤摸瓜,来看看该文件:

1
2
3
4
5
6
7
8
9
10
11
import Vue from 'core/index'
import {mountComponent} from 'core/instance/lifecycle'
Vue.prototype.__patch__ = inBrowser ? patch : noop

Vue.prototype.$mount = function (
el?: string | Element,
hydrating?: boolean
): Component {
el = el && inBrowser ? query(el) : undefined
return mountComponent(this, el, hydrating)
}

这里做了几件事:

  1. 引入了 Vue
  2. 定义了平台相关的 __patch__ 方法
  3. 定义了 $mount 函数

我们再来看一下 core/index

1
2
3
4
5
6
import Vue from './instance/index'
import {initGlobalAPI} from './global-api/index'

initGlobalAPI(Vue)

export default Vue

这里会初始化一些全局的 api:

1
2
3
4
5
6
7
8
9
10
11
12
13
14
15
16
17
18
19
20
21
22
23
Vue.util = {
warn,
extend,
mergeOptions,
defineReactive,
}

Vue.set = set
Vue.delete = del
Vue.nextTick = nextTick

/**
Vue.options = {
components: {} // 用来存储 component 的对象
}
**/
ASSET_TYPES.forEach((type) => {
Vue.options[type + 's'] = Object.create(null)
})
initUse(Vue) // Vue.use
initMixin(Vue) // Vue.mixin
initExtend(Vue) // Vue.extend
initAssetRegisters(Vue) // Vue.component,把组件的描述对象存到 Vue.options.components 里面

再来看一下 instance/index.js

1
2
3
4
5
6
7
8
9
10
11
12
13
14
15
16
17
18
19
20
21
22
23
24
import {initMixin} from './init'
import {stateMixin} from './state'
import {renderMixin} from './render'
import {eventsMixin} from './events'
import {lifecycleMixin} from './lifecycle'
import {warn} from '../util/index'

// Vue构造函数
function Vue(options) {
if (process.env.NODE_ENV !== 'production' && !(this instanceof Vue)) {
warn('Vue is a constructor and should be called with the `new` keyword')
}
// 初始化方法
this._init(options)
}

// 实现实例方法和属性
initMixin(Vue) // _init()
stateMixin(Vue) // $set/$delete/$watch
eventsMixin(Vue) // $on/$off/$once/$emit
lifecycleMixin(Vue) // $forceUpdate/_update()
renderMixin(Vue) // $nextTick _render

export default Vue

这里主要是在原型上挂载一些方法。然后,终于我们的主角 Vue 现身了!

首次渲染流程

先看一个简单的例子:

1
2
3
4
5
6
7
8
<div id="demo"></div>
<script>
const app = new Vue({
template: '<div>{{foo}}</div>',
data: {foo: 'foo'},
})
app.$mount('#demo')
</script>

该例子做了两件事:

  1. 实例化一个 Vue
  2. 将其挂载到 id 为 demo 的元素上

下面我们来看看这两步。

实例化

当我们实例化一个 Vue 对象时,我们会调用 _init 方法:

1
2
3
4
5
6
7
8
initLifecycle(vm) // $parent $root $children
initEvents(vm) // 事件监听相关
initRender(vm) // $slots/$createElement
callHook(vm, 'beforeCreate')
initInjections(vm) // 初始化 injection 的数据
initState(vm) // 核心:数据初始化,定义响应式数据
initProvide(vm) // 初始化 provide 的数据,放到 initInjections 的原因是 provide 的数据有可能会来自于 injections
callHook(vm, 'created')

挂载

entry-runtime-with-compiler.js 中对 $mount 方法进行了装饰,主要是为了把模板解析成 render 函数。这里就赋予了 vue 具有跨平台的能力,不同的平台只要实现自己平台下模板的转换即可。

1
2
3
4
5
6
7
8
9
10
11
12
13
14
15
16
17
18
19
20
21
22
23
24
25
26
27
28
29
30
31
32
33
34
35
36
37
38
39
40
41
42
43
44
45
46
47
48
49
50
51
52
import Vue from './runtime/index'

const mount = Vue.prototype.$mount
Vue.prototype.$mount = function (
el?: string | Element,
hydrating?: boolean
): Component {
// 获取到 DOM 对象
el = el && query(el)

const options = this.$options

// 如果用户手写了 render 函数就不需要转换模板了
if (!options.render) {
let template = options.template
if (template) {
if (typeof template === 'string') {
// 例如 template: '#app'
// 用已经存在的 html 中的元素的 innerHTML 作为模板
if (template.charAt(0) === '#') {
template = idToTemplate(template)
}
} else if (template.nodeType) {
// template: querySelector('#app')
// 用已经存在的 html 中的元素的 innerHTML 作为模板
template = template.innerHTML
} else {
return this
}
} else if (el) {
// 如果 el 有,就用 el 的 outerHTML
template = getOuterHTML(el)
}
if (template) {
// 把模板转为 render 函数
const {render, staticRenderFns} = compileToFunctions(
template,
{
shouldDecodeNewlines,
shouldDecodeNewlinesForHref,
delimiters: options.delimiters,
comments: options.comments,
},
this
)
options.render = render
options.staticRenderFns = staticRenderFns
}
}
// 调用之前的 mount
return mount.call(this, el, hydrating)
}

我们来看看 mount,它位于 platforms/web/runtime/index.js

1
2
3
4
5
6
7
Vue.prototype.$mount = function (
el?: string | Element,
hydrating?: boolean
): Component {
el = el && inBrowser ? query(el) : undefined
return mountComponent(this, el, hydrating)
}

最后是调用了 mountComponent (core/instance/lifecycle):

1
2
3
4
5
6
7
8
9
10
11
12
13
14
15
16
17
18
19
20
21
22
23
24
25
26
27
28
29
30
31
32
33
34
35
36
37
38
39
40
41
42
43
44
45
export function mountComponent(
vm: Component,
el: ?Element,
hydrating?: boolean
): Component {
vm.$el = el
if (!vm.$options.render) {
vm.$options.render = createEmptyVNode
}
callHook(vm, 'beforeMount')

let updateComponent
if (process.env.NODE_ENV !== 'production' && config.performance && mark) {
} else {
updateComponent = () => {
vm._update(vm._render(), hydrating)
}
}

// we set this to vm._watcher inside the watcher's constructor
// since the watcher's initial patch may call $forceUpdate (e.g. inside child
// component's mounted hook), which relies on vm._watcher being already defined
new Watcher(
vm,
updateComponent,
noop,
{
before() {
if (vm._isMounted) {
callHook(vm, 'beforeUpdate')
}
},
},
true /* isRenderWatcher */
)
hydrating = false

// manually mounted instance, call mounted on self
// mounted is called for render-created child components in its inserted hook
if (vm.$vnode == null) {
vm._isMounted = true
callHook(vm, 'mounted')
}
return vm
}

这里创建了一个 updateComponent 函数,并把它传递给了 new Watcher()。后面我们会讲到每个自定义组件都会执行 $mount,最终都会走到这里,即每个组件会对应一个 watcher。在 vue1 的时候,视图的更新粒度是非常小的,而且也不需要虚拟 dom 和 diff 算法,但是这样会导致一个组件中会出现很多个 watcher。vue2 为了避免出现这种情况,把更新粒度给增大了,所以现在就需要 vdom 和 diff 算法来精确的知道需要更新哪里了。

Watcher 的细节我们先不管,它里面肯定会去执行 updateComponent,最后会执行 _render_update,我们先来看看 _render

1
2
3
4
5
6
7
8
9
10
11
12
13
14
15
16
17
18
19
20
21
22
23
24
Vue.prototype._render = function (): VNode {
const vm: Component = this
const {render, _parentVnode} = vm.$options

if (_parentVnode) {
vm.$scopedSlots = _parentVnode.data.scopedSlots || emptyObject
}

// set parent vnode. this allows render functions to have access
// to the data on the placeholder node.
vm.$vnode = _parentVnode
// render self
let vnode
try {
vnode = render.call(vm._renderProxy, vm.$createElement)
} catch (e) {}
// return empty vnode in case the render function errored out
if (!(vnode instanceof VNode)) {
vnode = createEmptyVNode()
}
// set parent
vnode.parent = _parentVnode
return vnode
}

这里主要是执行 Vue 实例的 render 函数,生成 vnodevnode 会作为参数传给 _update

1
2
3
4
5
6
7
8
9
10
11
12
13
14
15
16
17
18
19
20
21
22
23
24
25
26
27
28
29
30
31
Vue.prototype._update = function (vnode: VNode, hydrating?: boolean) {
const vm: Component = this
const prevEl = vm.$el
const prevVnode = vm._vnode
const prevActiveInstance = activeInstance
activeInstance = vm
vm._vnode = vnode
// Vue.prototype.__patch__ is injected in entry points
// based on the rendering backend used.
if (!prevVnode) {
// initial render
vm.$el = vm.__patch__(vm.$el, vnode, hydrating, false /* removeOnly */)
} else {
// updates
vm.$el = vm.__patch__(prevVnode, vnode)
}
activeInstance = prevActiveInstance
// update __vue__ reference
if (prevEl) {
prevEl.__vue__ = null
}
if (vm.$el) {
vm.$el.__vue__ = vm
}
// if parent is an HOC, update its $el as well
if (vm.$vnode && vm.$parent && vm.$vnode === vm.$parent._vnode) {
vm.$parent.$el = vm.$el
}
// updated hook is called by the scheduler to ensure that children are
// updated in a parent's updated hook.
}

这里主要是调用了 vm.__patch__,它来自平台相关的目录 platforms/runtime/patch.js

1
2
import {createPatchFunction} from 'core/vdom/patch'
export const patch: Function = createPatchFunction({nodeOps, modules})

它只是把一些平台相关的配置传递给了 createPatchFunction,该函数执行后返回一个 patch 函数,vm.__patch__ 真正执行的是这个函数(这个函数有点复杂,我们先不展开):

1
return function patch(oldVnode, vnode, hydrating, removeOnly) {}

到这里,我们的首次渲染就快速走读完了。