模仿 big-react,使用 Rust 和 WebAssembly,从零实现 React v18 的核心功能。深入理解 React 源码的同时,还锻炼了 Rust 的技能,简直赢麻了!
代码地址:https://github.com/ParadeTo/big-react-wasm
本文对应 tag:v20
Based on big-react,I am going to implement React v18 core features from scratch using WASM and Rust.
Code Repository:https://github.com/ParadeTo/big-react-wasm
The tag related to this article:v20
Context 也是 React 中非常重要的一个特性,所以我们的 WASM 版也得安排上。回想下,我们平时一般都会这样来使用 Context:
Context is also a very important feature in React, so we need to include it in our WASM version as well. Let’s recall how we usually use Context:
1 | import {createContext, useContext} from 'react' |
所以,我们需要先从 react 库中导出两个方法:
So, we need to first export two methods from the React library:
1 |
|
其中,create_context 中的代码翻译成 JS,是下面这样:
The code inside create_context translates to the following in JavaScript:
1 | const context { |
可见,ctxA.Provider 是一种新的 FiberNode 类型,我们需要新增分支进行处理,按照流程顺序,首先是 begin_work:
As you can see, ctxA.Provider is a new type of FiberNode, and we need to add a new branch to handle it. Following the flow sequence, the first step is begin_work:
1 | fn update_context_provider( |
这里难以理解的是 push_provider:
The part that is difficult to understand here is push_provider.
1 | static mut PREV_CONTEXT_VALUE: JsValue = JsValue::null(); |
与之对应的,还有一个 pop_provider:
Correspondingly, there is also a pop_provider that goes along with it.
1 | pub fn pop_provider(context: &JsValue) { |
它会在 complete_work 中调用:
It will be called within complete_work.
1 | WorkTag::ContextProvider => { |
我们通过下面这个例子来搞清楚这部分代码:
We will clarify this portion of the code through the following example:
1 | const ctxA = createContext('A0') |
上述例子结果显而易见,应该是:
The expected result of the above example should be:
1 | A: A2 B: B2 |
我们来分析一下,根据流程,当 begin_work 执行到最底层的 Child 时,此时经过了四次 push_provider,FiberNode 状态如下:
Let’s analyze it. According to the flow, when begin_work reaches the bottommost Child, it goes through four push_provider operations, and the state of the FiberNode is as follows:
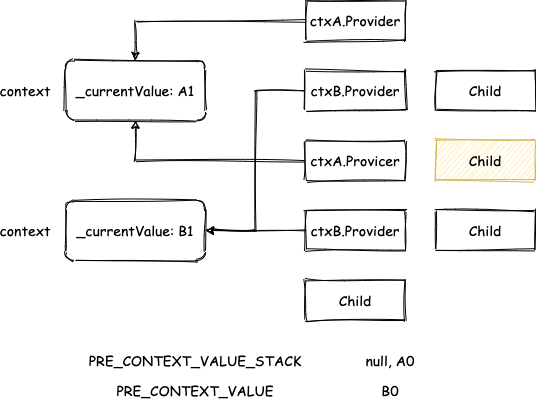
到了第三层的 Child 时,会执行一次 pop_provider,状态如下:
When it reaches the third level Child, it performs one pop_provider operation, and the state becomes:
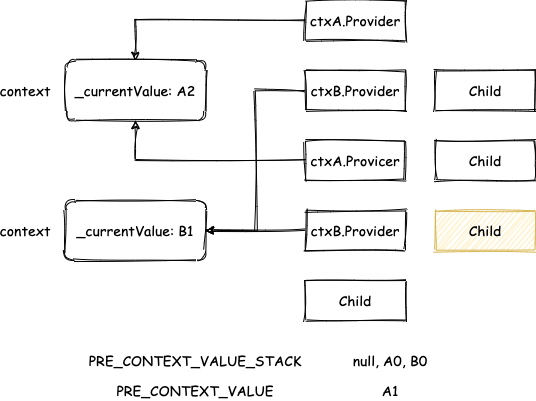
到了第二层的 Child 时,再执行一次 pop_provider,状态如下:
When it reaches the second level Child, it performs another pop_provider operation, and the state becomes:
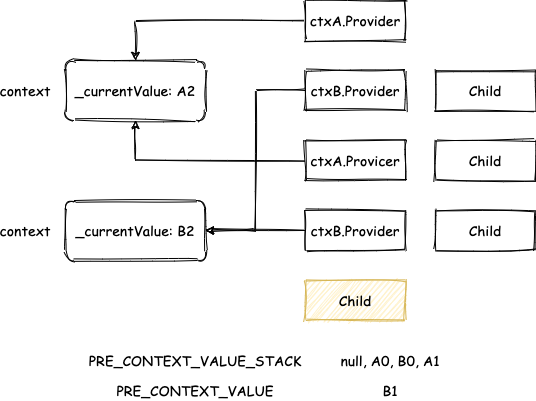
到了第一层的 Child 时,最后执行一次 pop_provider,状态如下:
When it reaches the first level Child, it performs the final pop_provider operation, and the state becomes:
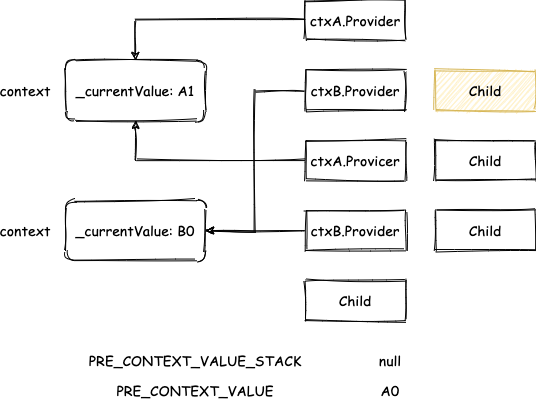
这里不好理解的原因在于它把多个 Context 的值都存到一个 stack 里面了,可以对着这个例子多看几遍。
The reason it may be difficult to understand is that it stores the values of multiple contexts in a single stack. You can go through this example a few more times to better understand it.
理解了这个,Context 的基本流程就介绍差不多了。不过还有一个 useContext,它也很简单,按照之前其他 Hooks 的流程添加相关代码即可,最后的核心是 fiber_hooks 中的 read_context 方法:
Once you understand this, the basic flow of Context is mostly covered. However, there is also useContext, which is quite simple. You can add the relevant code following the flow of other Hooks we discussed earlier, and the core is the read_context method in fiber_hooks.
1 | fn read_context(context: JsValue) -> JsValue { |
这样,上面的例子就可以跑起来了,本次更新详见这里。
With these changes, the example mentioned above can be executed. For more details about this update, please refer to here.
不过,目前的 Context 还不够完善,一旦它跟性能优化相关的特性结合起来使用,就会有问题了,比如下面这个例子:
However, the current implementation of Context is not yet complete. It can cause issues when combined with performance optimization-related features. For example, consider the following example:
1 | const ctx = createContext(0) |
点击后 Child 组件不会重新渲染,页面没有得到更新。原因在于 Child 命中了 bailout 策略,但其实 Child 中使用了 context,而 context 的值发生了变化,Child 应该重新渲染才对,这个问题就留到下篇文章再解决吧。
After clicking, the Child component does not re-render, and the page does not update. The reason is that the Child component hits the bailout strategy. However, the Child component actually uses context, and the value of the context has changed. The Child component should be re-rendered. We will address this issue in the next article.