实战 - Node.js 服务灰度发布系统 OOM 排查

之前这篇文章介绍了如何针对 Node.js 服务实现一个灰度发布系统,并选择了基于进程的方式。用代码来简单表示的话,就像这样:

1
2
3
4
5
6
7
8
9
10
11
12
13
14
15
16
17
18
19
20
21
22
23
24
25
26
27
28
29
30
31
32
33
34
35
36
37
38
39
40
41
42
43
44
45
46
47
48
49
50
51
52
53
54
55
56
57
58
59
60
61
62
63
64
65
66
// index.js
const cp = require('child_process')
const url = require('url')
const http = require('http')

const child1 = cp.fork('child.js', [], {
env: {PORT: 3000},
})
const child2 = cp.fork('child.js', [], {
env: {PORT: 3001},
})

function afterChildrenReady() {
let readyN = 0
let _resolve

const p = new Promise((resolve) => {
_resolve = resolve
})

const onReady = (msg) => {
if (msg === 'ready') {
if (++readyN === 2) {
_resolve()
}
}
}

child1.on('message', onReady)
child2.on('message', onReady)

return p
}

const httpServer = http.createServer(function (req, res) {
const query = url.parse(req.url, true).query

if (query.version === 'v1') {
http.get('http://localhost:3000', (proxyRes) => {
proxyRes.pipe(res)
})
} else {
http.get('http://localhost:3001', (proxyRes) => {
proxyRes.pipe(res)
})
}
})

afterChildrenReady().then(() => {
httpServer.listen(8000, () => console.log('Start http server on 8000'))
})

// child.js
const http = require('http')

const httpServer = http.createServer(function (req, res) {
res.writeHead(200, {'Content-Type': 'text/plain'})
setTimeout(() => {
res.end('handled by child, pid is ' + process.pid + '\n')
}, 1000)
})

httpServer.listen(process.env.PORT, () => {
process.send && process.send('ready')
console.log(`Start http server on ${process.env.PORT}`)
})

简单解释下上面代码,运行 index.js 时,会 fork 出两个子进程,主进程根据请求参数来决定代理到哪个子进程,从而实现不同用户看到不同的内容。

不过,由于多了一层代理,服务的性能肯定会受到影响。为了优化,可以考虑复用 TCP 链接,即在调用 http.request 的时候使用 agent(更多内容请见 在 Node.js 中使用 HTTP Agent 实现 keep-alive)。不过,就是因为这个,导致服务出了问题。

我们来模拟一下,首先,修改一下上面的代码,启动 TCP 链接复用,并规定只开启一条链接:

1
2
3
4
5
6
7
8
9
10
11
12
13
14
15
const agent = http.Agent({keepAlive: true, maxSockets: 1})

const httpServer = http.createServer(function (req, res) {
const query = url.parse(req.url, true).query

if (query.version === 'v1') {
http.get('http://localhost:3000', {agent}, (proxyRes) => {
proxyRes.pipe(res)
})
} else {
http.get('http://localhost:3001', {agent}, (proxyRes) => {
proxyRes.pipe(res)
})
}
})

然后,我们使用 autocannon -c 400 -d 100 http://localhost:8000 来进行压测。

测试结果发现:

  • 压测过程中,访问 http://localhost:8000 超时
  • 压测过程中,内存占用快速增长
  • 压测结束后,访问 http://localhost:8000 仍然超时,内存占用缓慢下降,过了很久以后访问才会有响应

我们可以把 TCP 链接比喻成一条铁路,一个 HTTP 的内容则会被分成若干个车厢在这条铁路上运输:

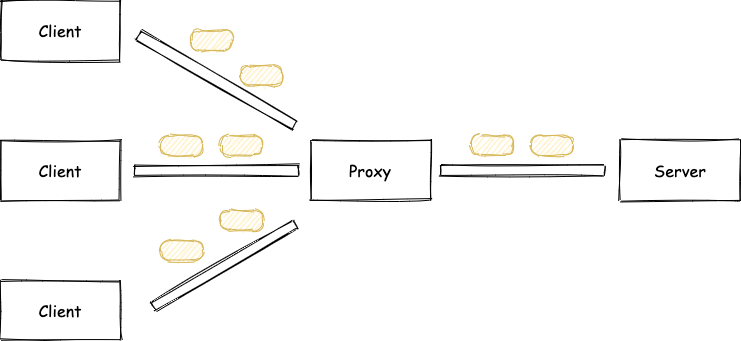
由于 Proxy 与 Server 之间只有一条路,当 Client 来的请求太快时,需要排队等待处理:

这样就解释了为什么压测过程中,请求会超时了。

而且由于 Proxy 生成了很多“请求”在排队,所以内存也会快速地增长,这点可以通过 Node.js 的 inspect 功能进一步分析。

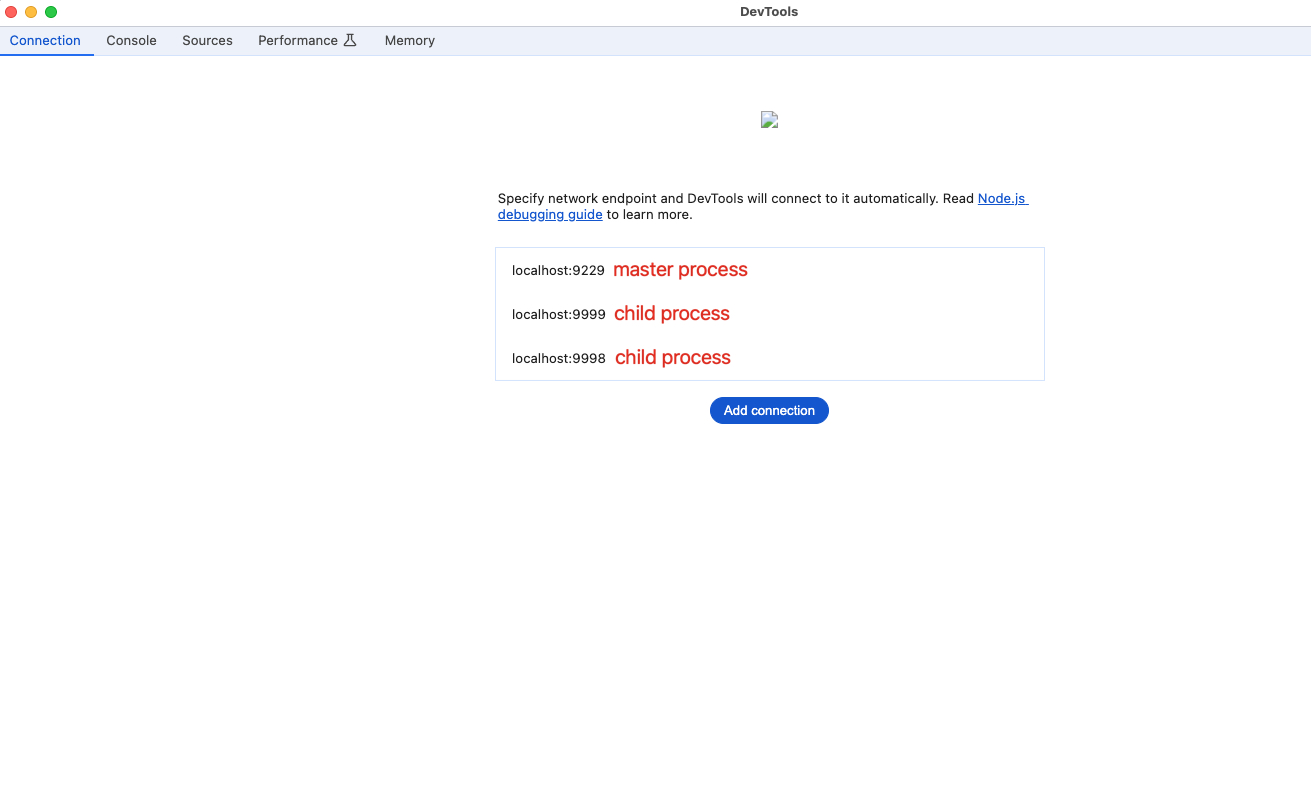
具体做法就是在启动 Node.js 进程的时候加上 --inspect 参数,通过 fork 函数启动的子进程可以使用 execArgv 来指定,如下所示:

1
2
3
4
5
6
7
8
const child1 = cp.fork('child.js', [], {
env: {PORT: 3000},
execArgv: ['--inspect=9999'],
})
const child2 = cp.fork('child.js', [], {
env: {PORT: 3001},
execArgv: ['--inspect=9998'],
})

然后,打开 chrome 的调试面板,点击 Node.js 的 DevTools,新增三个 connection 后就可以看到如下效果了:

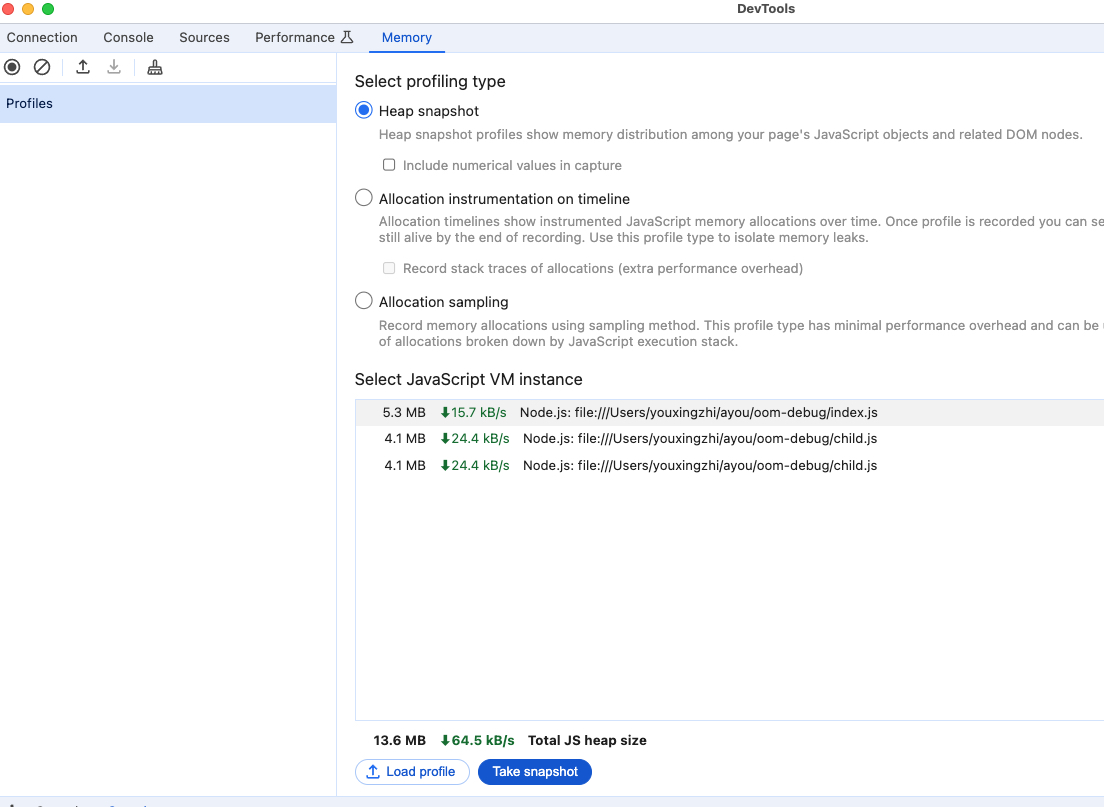
这里我们只看 master 进程,先获取一份内存快照,然后启动压测脚本,运行一段时间后再获取一次快照,比较前后两次快照,结果如下:

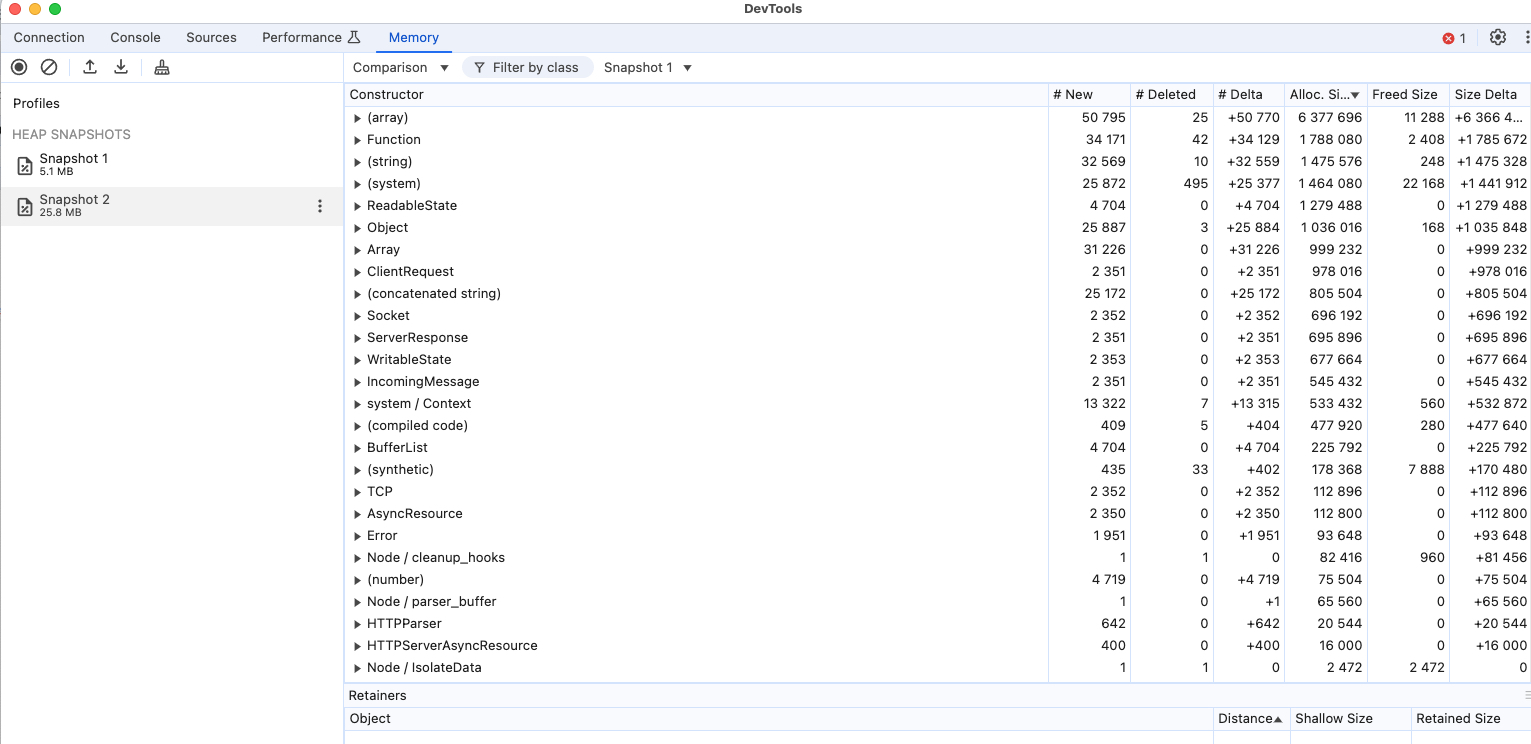
可以看到两次快照之间确实有很多 ClientRequest 新增,从而印证了我们前面的推测。

而压测结束后,虽然没有更多请求进入到 Proxy,但是由于之前已经积压了太多请求,而且 child.js 中每一个请求的响应都被我们人为的延迟了 1 秒,所以这些积压的请求处理起来非常慢,从而解释了为什么内存占用是缓慢地下降,并且要过很久以后访问才会有响应了。

“不要过早优化”是软件开发领域中一条金玉良言,这次算是深刻地体会到了,尤其是对某一项优化技术还处在一知半解的水平的时候更是如此。这次问题起因就是因为自诩之前对 Node.js 的 Agent 小有研究,才有“多此一举”,且没有仔细分析其影响以及做详细的性能压测。